If your child can float comfortably on his front for at least five seconds, then he’s ready to learn how to back float.

(This post contains affiliate links. This means if you click on an affiliate link and purchase the item, we will receive an affiliate commission at no extra cost to you. Full disclaimer.)
If he cannot perform a front float yet, go to Help Your Child Learn How to Front Float.
April 2019 update: I made this video which is filled with awesome tips to ease your child into back floating.
To teach the back float, you’ll need access to a swimming pool, preferably one with wide shallow steps, but it’s not necessary.
Your child might need a swimming headband or a swim cap
Even though your child may be comfortable, he might still be averse to the water entering his ears when he attempts a back float. It’s nothing that a swimming headband or an ear cap (swim cap) can’t fix.
A swimming headband is a neoprene band that fits nicely over the ears from the hairline and fastens in the back of the neck with velcro.
If you choose a swim cap, I recommend a silicone ear swim cap. The design includes excess material that completely covers the ears. Both options do a great job of keeping the water from tickling the ears which are really what the issue is for most children.

What about earplugs?
In my opinion, earplugs are more of a hassle than a remedy. They continually fall out of the ears. Headbands are supposed to keep them in place, but in my experience, that wasn’t always the case.
The ear swim cap or the headband without earplugs have worked 100% of the time with all of my ear sensitive students.
The back float is easy for some and not so easy for others
How well you back float is determined by body composition. The more air in the lungs and the more body fat, the easier it is to float. Good news for those who like desserts.
Muscle and bone on the other hand sink. A very muscular person with very little body fat will have trouble back floating.
The actual definition of floating is to rest or remain on the surface of a liquid according to Dictionary.com. A very muscular person will need to maintain a constant arm and leg action to stay afloat.
Head position for a successful back float
With the head back and the chin tilted up slightly, your child will be well on his way to floating on his back.
When first learning the back float, however, your child will probably not tilt his chin up enough to achieve this. With a little practice, he will begin to relax, positioning his head correctly and allowing the water to support him.

The back float doesn’t need to be horizontal
Your child will probably kick his feet up toward the surface. Discourage this, because when he kicks his feet up, his hips will drop and so will he.
Encourage him to stick out his belly button, pressing it up toward the sky and let the feet be where they want to be.
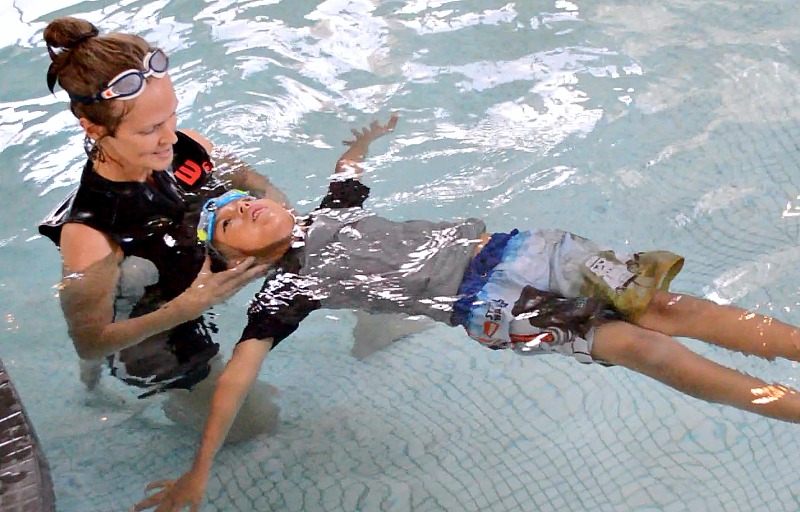
With the arms extended out like airplane wings and the head back, he will float with ease.
For some children, the feet might hang down, touching or almost touching the bottom. That’s okay. For others, they may naturally float in a more horizontal position or somewhere in between. All of which are perfectly good back floats.
How to let the feet be where they want to be
This is easier said than done. As mentioned previously, your child will probably kick his feet up toward the surface.
Just telling your child, “let your feet be where they want to be” or “don’t do anything with your feet” may work for some grade school children, but not so much with preschoolers and then repeating it will just fall on deaf ears.
So, instead of telling him to do nothing with his feet, you can tell him to tuck his feet under his body, but make sure he still sticks out his belly button.
How to support your child in a back float
Position yourself so that your shoulders are in the water. The back of your child’s head rests on your shoulder. Support his lower back with one hand and place your other hand on his stomach.
If he’s comfortable with this, cradle his head in the hand that was on his stomach and hold him close, right under your chin.
If he’s relaxed in this position, extend your arms to separate his head from your body.
As long as he is still happy, you can remove your hand from his back, but hold it close just in case he loses control.

Motivate your child to back float

Some preschoolers will flat out refuse to try the back float. A little motivation goes a long way.
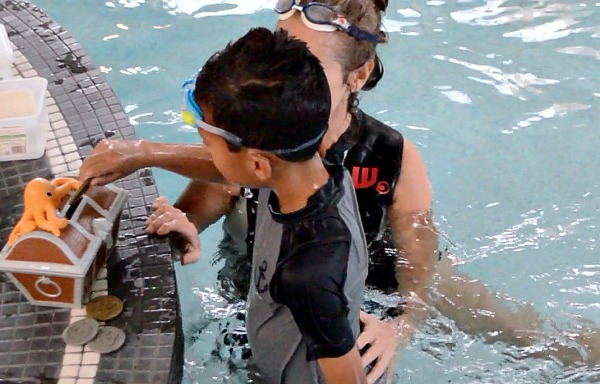
The Melissa & Doug Sunny Patch Undersea Treasure Hunt is a big hit with my students as young as 15-months of age. It comes with an opening at the top for inserting coins. It includes four coins, which is the perfect amount for this motivational activity.
Tell your child that when you hold him in a back float to the count of three (3 seconds), then he can drop a coin into the treasure chest. He’ll want to do it.
Don’t push him to do more than four back floats if he doesn’t want to. If he wants to do more, then go for it.
Experiment with letting go

If he remains calm while just supporting his head, then pull him close and rest his head on your chest.
Gently place your fingertips on either side of his head. Before letting go, make sure his head is tilted back enough. If he keeps his head back when you let go, he will be back floating independently. You might need to adjust his arms, belly button, and feet.
For a successful back float always remember – head back, arms out like airplane wings, stick out the belly button and let the feet be where they want to be. You can also suggest that he take a deep breath and hold it for a few seconds to make him extra buoyant.
Feeling the water float you on the wide shallow steps of the swimming pool

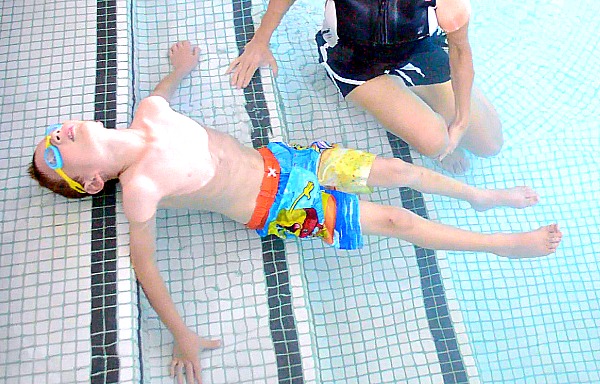
If your child wants to try the back float all by himself, the shallow steps are a great place to practice. You will need to demonstrate this first, however.
Sit down on one of the lower steps, support yourself with your hands as you lean back and gently rest your head on the top step. Keep your hands on the step, do nothing with your feet and stick out your belly button, so that you’re no longer in contact with the surface.
After a few seconds, allow your hands to rise off the step no more than an inch or two. Feel the water float you. Instruct your child to do the same and assist him when placing his head on the step.
Don’t expect it to be perfect. Your child probably won’t reach out far enough with his arms to allow his head to touch the surface at first. As he gets more comfortable with this, he’ll be able to do it with ease.
The back float at the wall
Using the wall forces your body into the correct position for the back float.
Demonstrate this first. Hold onto the wall or gutter with both hands in about 4 feet of water. Lower yourself down and press your belly button against the wall. Lay your head back in the water as you extend your arms.
When you feel like you’re floating, drop your hands in the water. When it’s time to let go, make sure you drop your hands and let them submerge. Don’t lift your hands, because if you lift your hands above the water, the weight of them will push you under the water.
When it’s your child’s turn, support her if necessary. The wall forces the feet down. When your child drifts away from the wall, she’ll probably want to kick her feet up. Encourage her to let the feet be where they want to be.

For a totally independent back float
The next step is to be able to back float without your assistance.
Have your child continue to practice at the wall until he can do it independently. Once he’s comfortable with this, have him try it without the wall. At this point, suggest that your child uses a nose clip.
I have my students imagine that the wall is right in front of them, then get them to put their belly button against the pretend wall. If they’re struggling with this, I’ll put my hand out and have them pretend that my hand is the wall.
After they put their belly button against my hand, they’ll attempt a back float. At this point, they usually need to be reminded of all of the components of a back float.
Remember – head back, arms out like airplane wings, stick out the belly button and let the feet be where they want to be. You can also suggest that he take a deep breath and hold it for a few seconds to make him extra buoyant.
How long will it take my child to learn to back float?
As long as he can front float independently for at least five seconds, he will probably acquire the skills to back float within two to three practice sessions with your assistance.
It might take a little longer if he’s under five years old. A totally independent back float will take a few more practice sessions.
Once he can do it unaided for at least fifteen seconds consistently, then it’s time to play with his newly acquired skills.
I tell my “sinkers” that the only thing they need to keep above the water is their mouth and nose because they don’t breathe with their ears or their feet. Other than their nose and mouth, everything else can just sort of hang where ever it wants to be. Many kids I’ve had want to stick their legs straight out and they try to look at their feet! I haven’t figured out why but I tell them to look up at the sky and don’t worry about their feet because their feet are still there – there are no sharks in the pool. Seems to work generally for most.
Exactly. Couldn’t have said it better myself. Great advice. Thank you.