If your child can front float independently for at least five seconds and back float unaided for at least fifteen seconds consistently, then she’s ready to learn how to roll and experiment with other ways of floating.
 Not there yet? Go to Help Your Child Learn How to Front Float or Back Float.
Going from horizontal to vertical
Make sure your child can stand up after floating.
From a front float, have her lift her head out of the water, forcing the arms down, bring her knees under her body then place her feet on the bottom and stand up.
Discover how hard it is to sink
It’s a lot of fun to try to sit on the bottom of the pool. Challenge your child to try it. She might get obsessed with this. It’s happened with a few of my students. Don’t discourage her; it’s a great learning opportunity.
She’ll discover that even if she wants to sink, it’s next to impossible. Her body will just float right back up to the surface. If she’s not already convinced that the water floats her, this will make her a believer.
Diving for objects
Diving for objects is a favorite activity among my students. After learning how hard it is to sink, your child will find this to be an enjoyable challenge.
Start by dropping a few sinkable objects, such as rings, torpedoes or treasure in two to three feet of water. Go deeper for bigger kids. It’s best to start with rings as they’re easier to grasp.
Let your child try to figure out how to get down far enough to reach for the object. After a few attempts, you can give her a little push towards the bottom, if she needs help. Eventually, she’ll figure it out.
To teach her how to get to the bottom: she will start in a front float, then bend forcefully at the waist, which will drive her hips up and her torso down, which will put her in reaching distance of the object.
To explain this in a way for her to understand, you might say, “kick your feet down” or “stick your bottom up in the air or up to the sky” after she’s in her front float.
Tuck float
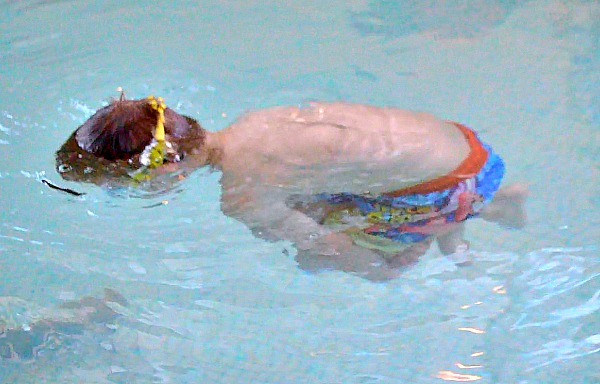
Have a ball becoming a ball. A tuck float is when you float while you hug your knees and tuck your chin to your chest, forming the shape of a ball.
I don’t know what it is about the tuck float, but my students love doing it repeatedly.
In chest-deep water, instruct your child to take a breath, put his face in the water and tuck his chin to his chest, bring his knees up to his chest and wrap his arms around his legs, just below his knees then allow his body to rise to the surface. Have him hold this position for at least five seconds.
Jellyfish float
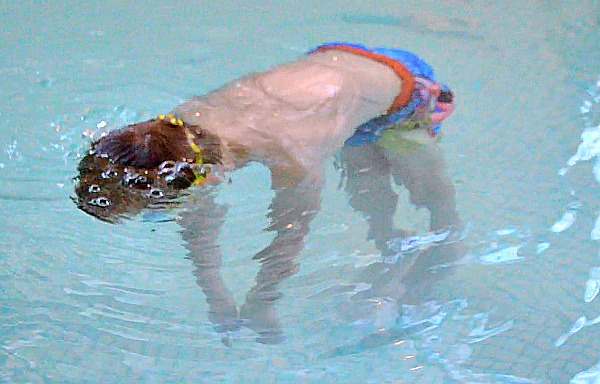
Pretend to be a jellyfish. Imagine that your limbs and your head are the tentacles of a jellyfish.
Now, in chest-deep water have your child hold his breath, put his face in the water and let his arms, legs, and head hang, relaxing as much as possible. Try to be a jellyfish for at least five seconds.
Some younger children find this to be a challenge. Others have a hard time relaxing in this position. Their arms and legs are straight and stiff.
Discover more with the back float
If your child is completely comfortable and relaxed with the back float and can do it independently every time for at least fifteen seconds, then he’s ready to experiment with it.
It’s a good idea to use a nose clip for this activity since his face may go under the water without warning. You don’t want water entering your child’s nose when he is face up in a supine position. It is most unpleasant to the say the least.
Once he’s in a back float, have him play around with the position of his arms. Keeping his arms just below the surface, have him sweep his arms slowly around and up to above his head (arms remain under the water).
Try to sink from a back float
Now, see if he can figure out how to sink from a back float.
If he brings his chin to his chest, if he kicks his feet up toward the surface and if he reaches with his arms out of the water and up toward the sky, he will sink.
Roll over
Rolling over is an essential safety skill. When learning how to swim on your front, first you must learn how to swim with your face in the water. Being able to roll over on to your back to rest and catch your breath comes in very handy when you get tired from swimming.
When first learning how to roll, most children will have a difficult time keeping the water out of their nose. A nose clip comes highly recommended at this point, especially when rolling from their front to their back. Not the case when rolling from their back to their front.
Have your child perform a back float for a couple of seconds, then hold their breath, roll over and stand up.
Now try from a front float. Have your child hold their breath, execute a front float for at least a couple of seconds, roll to their back and float for a few seconds, then stand up.
Your child might need some help with this one. When attempting to roll over, they may wind up in a sitting position. To fix this, tell your child to “first look at the bottom of the pool, then look at the sky or ceiling, not the walls.” Also, remind them to stick out their belly button to complete the back float.
Otter rolls
Another critical safety skill is the otter roll. It starts in a back float and ends in a front float. In this instance, however, you roll forward rather than sideways.
Have your child perform a back float for a few seconds, then hold his breath and tuck his chin to his chest and then continue to press his chin against his chest. If he maintains this position without using his arms or legs, he will end up in a front float.
If your child is pressing his chin against his chest and doesn’t appear to be rolling forward, it’s likely because he is holding his back straight. Encourage him to relax and round his back (like a tuck float).
After he gets the hang of it, have him do a back float at the wall. Once he starts floating and drifting away from the wall for a few seconds; have him perform an otter roll to get back to the wall.
Jumping in
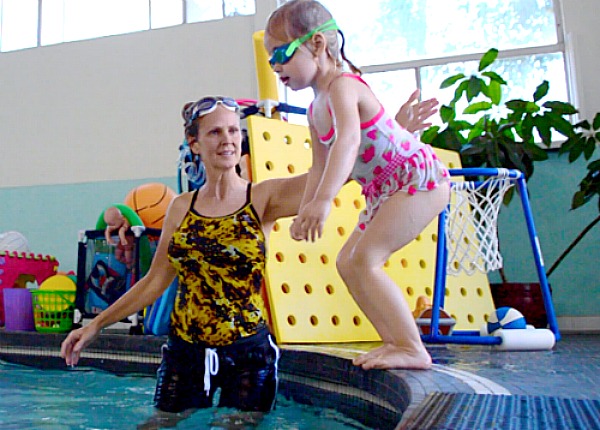
Start by having your child jump into chest or shoulder-deep water. Any more shallow is discouraged as it’s not safe.
To prepare for the jump, have her put her toes over the edge, give her a point of entry, which should be about a foot from the side.
Now have her jump in on your cue of “1,2,3”. To keep her from possibly hitting the wall on her way in, stand in the pool at her side and place your hand behind her back and be ready to give her a little shove if it appears that she’s about to hit the edge.
If she’s not comfortable with jumping, you can have her take a big step in or enter from a sitting or squatting position. Remind her that after she jumps in, that she can stand up and her head will be out of the water.
Also, make it a habit to have her always get back to the wall after jumping in. Even if all she’s doing at this point is standing up, turning around and stepping back to the wall, it’s ultimately teaching her to swim to safety.
What comes next?

Leave a Reply